
Seeing that the amount of sun doesn’t hold up to the amount of rain we have in the Netherlands I scanned the internet for a facial tanner yesterday morning. Didn’t take too long, apparently a lot of people buy them only to get rid of them some time later on, but the same day I ended up with a nice second hand facial tanner from Eurosolar. The thing that made me go with this one (as there are a LOT of ‘pre-loved’ ones online) is that is has 12 lights instead of the usual 4, making it quite a bit wider than most tanners.

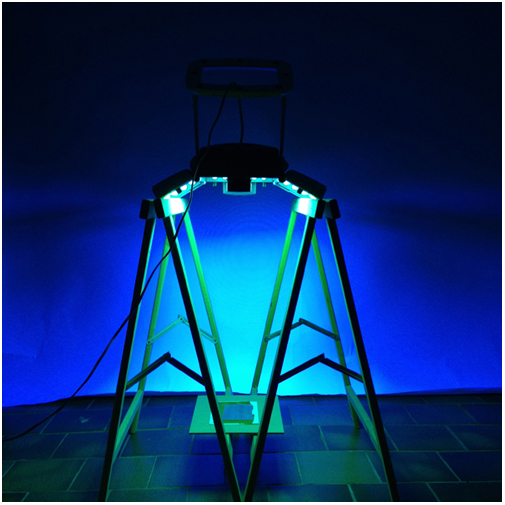
Last night I took it downstairs to see if it would do any good. It sure did! Exposure time now reduced to about 18 minutes instead of the almost 40 minutes of before. I’ll refine this setup later on to also shorten the distance between the lights and the contact print and shorten exposure times even further.
I set it up on two supports, lights facing down and put a small board at the bottom which holds the paper and the negative on top, then covered by a clear glass plate to hold it flat. This is a real basic setup which will undergo a few changes in the future but it does its job. The light from this tanning machine is really annoying for your eyes so I wear sun glasses with UV-protection to cover them a little.
The first image I tried was the one I printed the first time, the 4×5″ collodion negative of the train. This time, and here I learnt a very important lesson, I faced the emulsion layer down so it touched the emulsion layer on the paper (make sure your paper is REALLY dry before you end up ruining your precious negative!). This resulted in a much sharper image as you can see on the scan below.
Paper used: Fabriano Artistico GG
Single coated paper 13×18 cm
Exposure time: 17 minutes

The next I wanted to try was an 8×10″ normal Fomapan negative I made like 2 years ago right before I dived into wet plate collodion photography and never bothered to work with those sheets again. This was a test photo I made back then to get to know the camera so nothing special but as it has a much higher density, a nice gradation and is of bigger size than 4×5″ I felt an irresistible urge to try it 😉
I cut a 24×30 cm sheet of other paper that I also bought and wanted to try, namely Fabriano Artistico GF and coated it a single time, right before using it. The tricky part about my character is that I can be pretty impatience and want to see result. So I used a hair dryer to speed up the drying but decided too soon it was okay to use. I set up the exposure while the paper was actually still a bit moist. This resulted in weird stains and an uneven density in the print. Lesson learned!
Now that I’ve tried it a couple of times it’s time to refine my approach so the next session I will double coat the papers the evening before the printing day and allow it to dry properly.
Paper used: Fabriano Artistico LS
Single coated paper 24×30 cm
Exposure time: 19 minutes

It’s a matter of trial and error but I really enjoy this. I will definitely try and print this negative again as I love the soft delicate feel of this process. It’s almost creamy. My senses are tickled and I really don’t know where to begin; scan negatives with my newly acquired scanner, the Epson V700 (in order to try and), learn how to make proper digital negatives, refine my collodion negative-making which is also in the planning as I received my Pyro-chem for the developer.
And then there’s salt printing I want to try, albumen printing, somewhere in between I’d like to finish my book; Crime and Punishment by Dostoyevski (oh, what a wonderful writer!), hang out with friends, and sleep somewhere too…anyway…I’m not likely to be bored anytime soon 😉
Bon weekend chers amis!

Nice rerults. Glad the tip worked. I am using a large one also for sunning my silverbath !
Just give it a try
Thanks! I already had in mind buying one but your post confirmed my belief this would work. Good idea to use it on my silver bath, I have to sun it anyway and if I have to wait for the sun to hit town I can wait forever it seems 😉